作者:Burak Guzel
原文链接:http://net.tutsplus.com/tutorials/php/techniques-and-resources-for-mastering-curl/
翻译:笨活儿

cURL 是一个利用 URL 语法规定来传输文件和数据的工具,支持很多协议,如 HTTP、FTP、TELNET 等。最爽的是,PHP 也支持 cURL 库。本文将介绍 cURL 的一些高级特性,以及在 PHP 中如何运用它。
为什么要用 cURL?
是的,我们可以通过其他办法获取网页内容。大多数时候,我因为想偷懒,都直接用简单的PHP函数:
1 2 3 4 5 |
$content = file_get_contents("http://www.nettuts.com"); // or $lines = file("http://www.nettuts.com"); // or readfile(http://www.nettuts.com); |
不过,这种做法缺乏灵活性和有效的错误处理。而且,你也不能用它完成一些高难度任务——比如处理coockies、验证、表单提交、文件上传等等。
基本结构
在学习更为复杂的功能之前,先来看一下在 PHP 中建立 cURL 请求的基本步骤:
- 初始化
- 设置变量
- 执行并获取结果
- 释放 cURL 句柄
1 2 3 4 5 6 7 8 9 10 11 12 13 |
// 1. 初始化 $ch = curl_init(); // 2. 设置选项,包括URL curl_setopt($ch, CURLOPT_URL, "http://www.nettuts.com"); curl_setopt($ch, CURLOPT_RETURNTRANSFER, 1); curl_setopt($ch, CURLOPT_HEADER, 0); // 3. 执行并获取HTML文档内容 $output = curl_exec($ch); // 4. 释放curl句柄 curl_close($ch); |
第二步(也就是 curl_setopt() )最为重要,一切玄妙均在此。有一长串 cURL 参数可供设置,它们能指定 URL 请求的各个细节。要一次性全部看完并理解可能比较困难,所以今天我们只试一下那些更常用也更有用的选项。
检查错误
你可以加一段检查错误的语句(虽然这并不是必需的):
1 2 3 4 5 6 |
// ... $output = curl_exec($ch); if ($output === FALSE) { echo "cURL Error: " . curl_error($ch); } // ... |
请注意,比较的时候我们用的是“=== FALSE”,而非“== FALSE”。因为我们得区分 空输出 和 布尔值 FALSE,后者才是真正的错误。
获取信息
这是另一个可选的设置项,能够在 cURL 执行后获取这一请求的有关信息:
1 2 3 4 5 |
// ... curl_exec($ch); $info = curl_getinfo($ch); echo '获取'. $info['url'] . '耗时'. $info['total_time'] . '秒'; // ... |
返回的数组中包括了以下信息:
“url” //资源网络地址
“content_type” //内容编码
“http_code” //HTTP状态码
“header_size” //header的大小
“request_size” //请求的大小
“filetime” //文件创建时间
“ssl_verify_result” //SSL验证结果
“redirect_count” //跳转技术
“total_time” //总耗时
“namelookup_time” //DNS查询耗时
“connect_time” //等待连接耗时
“pretransfer_time” //传输前准备耗时
“size_upload” //上传数据的大小
“size_download” //下载数据的大小
“speed_download” //下载速度
“speed_upload” //上传速度
“download_content_length”//下载内容的长度
“upload_content_length” //上传内容的长度
“starttransfer_time” //开始传输的时间
“redirect_time”//重定向耗时
基于浏览器的重定向
在第一个例子中,我们将提供一段用于侦测服务器是否有基于浏览器的重定向的代码。例如,有些网站会根据是否是手机浏览器甚至用户来自哪个国家来重定向网页。
我们利用 CURLOPT_HTTPHEADER 选项来设定我们发送出的 HTTP 请求头信息(http headers),包括 user agent 信息和默认语言。然后我们来看看这些特定网站是否会把我们重定向到不同的URL。
1 2 3 4 5 6 7 8 9 10 11 12 13 14 15 16 17 18 19 20 21 22 23 24 25 26 27 28 29 30 31 32 33 34 35 36 37 38 39 40 41 42 43 44 45 46 47 48 49 50 51 52 53 54 55 56 57 58 59 60 61 62 63 64 65 66 67 68 69 70 |
// test URLs $urls = array( "http://www.cnn.com", "http://www.mozilla.com", "http://www.facebook.com" ); // test browsers $browsers = array( "standard" => array ( "user_agent" => "Mozilla/5.0 (Windows; U; Windows NT 6.1; en-US; rv:1.9.1.6) Gecko/20091201 Firefox/3.5.6 (.NET CLR 3.5.30729)", "language" => "en-us,en;q=0.5" ), "iphone" => array ( "user_agent" => "Mozilla/5.0 (iPhone; U; CPU like Mac OS X; en) AppleWebKit/420+ (KHTML, like Gecko) Version/3.0 Mobile/1A537a Safari/419.3", "language" => "en" ), "french" => array ( "user_agent" => "Mozilla/4.0 (compatible; MSIE 7.0; Windows NT 5.1; GTB6; .NET CLR 2.0.50727)", "language" => "fr,fr-FR;q=0.5" ) ); foreach ($urls as $url) { echo "URL: $urln"; foreach ($browsers as $test_name => $browser) { $ch = curl_init(); // set url curl_setopt($ch, CURLOPT_URL, $url); // set browser specific headers curl_setopt($ch, CURLOPT_HTTPHEADER, array( "User-Agent: {$browser['user_agent']}", "Accept-Language: {$browser['language']}" )); // we don't want the page contents curl_setopt($ch, CURLOPT_NOBODY, 1); // we need the HTTP Header returned curl_setopt($ch, CURLOPT_HEADER, 1); // return the results instead of outputting it curl_setopt($ch, CURLOPT_RETURNTRANSFER, 1); $output = curl_exec($ch); curl_close($ch); // was there a redirection HTTP header? if (preg_match("!Location: (.*)!", $output, $matches)) { echo "$test_name: redirects to $matches[1]n"; } else { echo "$test_name: no redirectionn"; } } echo "nn"; } |
首先,我们建立一组需要测试的URL,接着指定一组需要测试的浏览器信息。最后通过循环测试各种URL和浏览器匹配可能产生的情况。
因为我们指定了cURL选项,所以返回的输出内容则只包括HTTP头信息(被存放于 $output 中)。利用一个简单的正则,我们检查这个头信息中是否包含了“Location:”字样。
运行这段代码应该会返回如下结果:

用POST方法发送数据
当发起 GET 请求时,数据可以通过“查询字串”(query string)传递给一个URL。例如,在google中搜索时,搜索关键即为 URL 的查询字串的一部分:
http://www.google.com/search?q=nettuts
这种情况下你可能并不需要 cURL 来模拟。把这个 URL 丢给“file_get_contents()”就能得到相同结果。
不过有一些 HTML 表单是用 POST 方法提交的。这种表单提交时,数据是通过 HTTP 请求体(request body) 发送,而不是查询字串。例如,当使用 CodeIgniter 论坛的表单,无论你输入什么关键字,总是被 POST 到如下页面:
http://codeigniter.com/forums/do_search/
你可以用 PHP 脚本来模拟这种 URL 请求。首先,新建一个可以接受并显示 POST 数据的文件,我们给它命名为post_output.php:
print_r($_POST);
接下来,写一段 PHP 脚本来执行 cURL 请求:
1 2 3 4 5 6 7 8 9 10 11 12 13 |
$url = "http://localhost/post_output.php"; $post_data = array ( "foo" => "bar", "query" => "Nettuts", "action" => "Submit"); $ch = curl_init(); curl_setopt($ch, CURLOPT_URL, $url); curl_setopt($ch, CURLOPT_RETURNTRANSFER, 1); // 我们在POST数据哦! curl_setopt($ch, CURLOPT_POST, 1); // 把post的变量加上 curl_setopt($ch, CURLOPT_POSTFIELDS, $post_data); $output = curl_exec($ch); curl_close($ch); echo $output; |
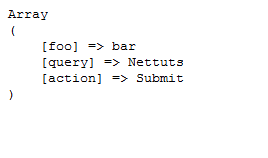
执行代码后应该会得到以下结果:

这段脚本发送一个 POST 请求给 post_output.php ,这个页面 $_POST 变量并返回,我们利用 cURL 捕捉了这个输出。
文件上传
上传文件和前面的 POST 十分相似。因为所有的文件上传表单都是通过 POST 方法提交的。
首先新建一个接收文件的页面,命名为 upload_output.php:
print_r($_FILES);
以下是真正执行文件上传任务的脚本:
1 2 3 4 5 6 7 8 9 10 11 12 13 14 15 16 |
$url = "http://localhost/upload_output.php"; $post_data = array ( "foo" => "bar", // 要上传的本地文件地址 "upload" => "@C:/wamp/www/test.zip" ); $ch = curl_init(); curl_setopt($ch, CURLOPT_URL, $url); curl_setopt($ch, CURLOPT_RETURNTRANSFER, 1); curl_setopt($ch, CURLOPT_POST, 1); curl_setopt($ch, CURLOPT_POSTFIELDS, $post_data); $output = curl_exec($ch); curl_close($ch); echo $output; |
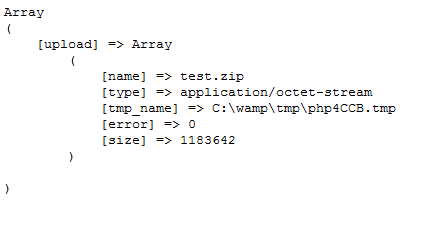
如果你需要上传一个文件,只需要把文件路径像一个 post 变量一样传过去,不过记得在前面加上@符号。执行这段脚本应该会得到如下输出:

cURL批处理(multi cURL)
cURL 还有一个高级特性——批处理句柄(handle)。这一特性允许你同时或异步地打开多个URL连接。
下面是来自来自 php.net 的示例代码:
1 2 3 4 5 6 7 8 9 10 11 12 13 14 15 16 17 18 19 20 21 22 23 24 25 26 27 28 29 30 31 32 33 34 35 36 37 |
// 创建两个cURL资源 $ch1 = curl_init(); $ch2 = curl_init(); // 指定URL和适当的参数 curl_setopt($ch1, CURLOPT_URL, "http://lxr.php.net/"); curl_setopt($ch1, CURLOPT_HEADER, 0); curl_setopt($ch2, CURLOPT_URL, "http://www.php.net/"); curl_setopt($ch2, CURLOPT_HEADER, 0); // 创建cURL批处理句柄 $mh = curl_multi_init(); // 加上前面两个资源句柄 curl_multi_add_handle($mh,$ch1); curl_multi_add_handle($mh,$ch2); // 预定义一个状态变量 $active = null; // 执行批处理 do { $mrc = curl_multi_exec($mh, $active); } while ($mrc == CURLM_CALL_MULTI_PERFORM); while ($active && $mrc == CURLM_OK) { if (curl_multi_select($mh) != -1) { do { $mrc = curl_multi_exec($mh, $active); } while ($mrc == CURLM_CALL_MULTI_PERFORM); } } //关闭各个句柄 curl_multi_remove_handle($mh, $ch1); curl_multi_remove_handle($mh, $ch2); curl_multi_close($mh); |
这里要做的就是打开多个 cURL 句柄并指派给一个批处理句柄。然后你就只需在一个 while 循环里等它执行完毕。
这个示例中有两个主要循环。第一个 do-while 循环重复调用 curl_multi_exec() 。这个函数是无隔断(non-blocking)的,但会尽可能少地执行。它返回一个状态值,只要这个值等于常量 CURLM_CALL_MULTI_PERFORM ,就代表还有一些刻不容缓的工作要做(例如,把对应 URL 的 http 头信息发送出去)。也就是说,我们需要不断调用该函数,直到返回值发生改变。
而接下来的 while 循环,只在 $active 变量为 true 时继续。这一变量之前作为第二个参数传给了 curl_multi_exec() ,代表只要批处理句柄中是否还有活动连接。接着,我们调用 curl_multi_select() ,在活动连接(例如接受服务器响应)出现之前,它都是被“屏蔽”的。这个函数成功执行后,我们又会进入另一个 do-while 循环,继续下一条URL。
还是来看一看怎么把这一功能用到实处吧:
WordPress 连接检查器
想象一下你有一个文章数目庞大的博客,这些文章中包含了大量外部网站链接。一段时间之后,因为这样那样的原因,这些链接中相当数量都失效了。要么是被和谐了,要么是整个站点都被功夫网了…
我们下面建立一个脚本,分析所有这些链接,找出打不开或者 404 的网站/网页,并生成一个报告。
请注意,以下并不是一个真正可用的 WordPress 插件,仅仅是一段独立功能的脚本而已,仅供演示,谢谢。
好,开始吧。首先,从数据库中读取所有这些链接:
1 2 3 4 5 6 7 8 9 10 11 12 13 14 15 16 17 18 19 20 21 22 23 24 25 26 27 28 29 30 31 32 33 34 35 36 37 38 39 40 41 42 43 44 45 46 47 48 49 50 51 52 53 54 55 |
// CONFIG $db_host = 'localhost'; $db_user = 'root'; $db_pass = ''; $db_name = 'wordpress'; $excluded_domains = array( 'localhost', 'www.mydomain.com'); $max_connections = 10; // initialize some variables $url_list = array(); $working_urls = array(); $dead_urls = array(); $not_found_urls = array(); $active = null; // connect to MySQL if (!mysql_connect($db_host, $db_user, $db_pass)) { die('Could not connect: ' . mysql_error()); } if (!mysql_select_db($db_name)) { die('Could not select db: ' . mysql_error()); } // get all published posts that have links $q = "SELECT post_content FROM wp_posts WHERE post_content LIKE '%href=%' AND post_status = 'publish' AND post_type = 'post'"; $r = mysql_query($q) or die(mysql_error()); while ($d = mysql_fetch_assoc($r)) { // get all links via regex if (preg_match_all("!href="(.*?)"!", $d['post_content'], $matches)) { foreach ($matches[1] as $url) { // exclude some domains $tmp = parse_url($url); if (in_array($tmp['host'], $excluded_domains)) { continue; } // store the url $url_list []= $url; } } } // remove duplicates $url_list = array_values(array_unique($url_list)); if (!$url_list) { die('No URL to check'); } |
我们首先配置好数据库,一系列要排除的域名($excluded_domains),以及最大并发连接数($max_connections)。然后,连接数据库,获取文章和包含的链接,把它们收集到一个数组中($url_list)。
下面的代码有点复杂了,因此我将一小步一小步地详细解释:
1 2 3 4 5 6 7 8 9 10 11 12 13 14 15 16 17 18 19 20 21 22 23 24 25 26 27 28 29 30 31 32 33 34 35 36 37 38 39 40 41 42 43 44 45 46 47 48 49 50 51 52 53 54 55 56 57 58 59 60 61 62 63 64 65 66 67 68 69 70 71 72 73 74 75 76 77 78 79 80 81 82 83 84 85 86 87 88 89 90 91 92 93 94 95 96 97 98 99 100 101 102 103 |
// 1. 批处理器 $mh = curl_multi_init(); // 2. 加入需要批处理的 URL for ($i = 0; $i < $max_connections; $i++) { add_url_to_multi_handle($mh, $url_list); } // 3. 初始化处理 do { $mrc = curl_multi_exec($mh, $active); } while ($mrc == CURLM_CALL_MULTI_PERFORM); // 4. 主循环 while ($active && $mrc == CURLM_OK) { // 5. 有活动链接 if (curl_multi_select($mh) != -1) { // 6. 干活 do { $mrc = curl_multi_exec($mh, $active); } while ($mrc == CURLM_CALL_MULTI_PERFORM); // 7. 是否有信息? if ($mhinfo = curl_multi_info_read($mh)) { // 意味着该链接正常结束 // 8. 从 curl 句柄获取信息 $chinfo = curl_getinfo($mhinfo['handle']); // 9. 死链? if (!$chinfo['http_code']) { $dead_urls []= $chinfo['url']; // 10. 404? } else if ($chinfo['http_code'] == 404) { $not_found_urls []= $chinfo['url']; // 11. 还能用 } else { $working_urls []= $chinfo['url']; } // 12. 移除句柄 curl_multi_remove_handle($mh, $mhinfo['handle']); curl_close($mhinfo['handle']); // 13. 加入新 URL,干活 if (add_url_to_multi_handle($mh, $url_list)) { do { $mrc = curl_multi_exec($mh, $active); } while ($mrc == CURLM_CALL_MULTI_PERFORM); } } } } // 14. 结束 curl_multi_close($mh); echo "==Dead URLs==n"; echo implode("n",$dead_urls) . "nn"; echo "==404 URLs==n"; echo implode("n",$not_found_urls) . "nn"; echo "==Working URLs==n"; echo implode("n",$working_urls); // 15. 向批处理器添加 URL function add_url_to_multi_handle($mh, $url_list) { static $index = 0; // 如果还有 URL 没用 if ($url_list[$index]) { // 新建 curl 句柄 $ch = curl_init(); // 配置 curl curl_setopt($ch, CURLOPT_URL, $url_list[$index]); // 不想输出返回内容 curl_setopt($ch, CURLOPT_RETURNTRANSFER, 1); // 跟踪重定向 curl_setopt($ch, CURLOPT_FOLLOWLOCATION, 1); // 不需要返回内容,节省带宽和时间 curl_setopt($ch, CURLOPT_NOBODY, 1); // 加入到批处理器中 curl_multi_add_handle($mh, $ch); // 拨一下计数器,下次调用该函数就能添加下一个 url 了 $index++; return true; } else { // 没有新的URL需要处理了 return false; } } |
下面解释一下以上代码。列表的序号对应着代码注释中的顺序数字。
- 新建一个批处理器。Created a multi handle.
- 稍后我们将创建一个把URL加入批处理器的函数 add_url_to_multi_handle() 。每当这个函数被调用,就有一个新url被加入批处理器。一开始,我们给批处理器添加了10个URL(这一数字由 $max_connections 所决定)。
- 运行 curl_multi_exec() 进行初始化工作是必须的,只要它返回 CURLM_CALL_MULTI_PERFORM 就还有事情要做。这么做主要是为了创建连接,它不会等待完整的URL响应。
- 只要批处理中还有活动连接主循环就会一直持续。
- curl_multi_select() 会一直等待,直到某个URL查询产生活动连接。
- cURL的活儿又来了,主要是获取响应数据。
- 检查各种信息。当一个URL请求完成时,会返回一个数组。
- 在返回的数组中有一个 cURL 句柄。我们利用其获取单个cURL请求的相应信息。
- 如果这是一个死链或者请求超时,不会返回http状态码。
- 如果这个页面找不到了,会返回404状态码。
- 其他情况我们都认为这个链接是可用的(当然,你也可以再检查一下500错误之类…)。
- 从该批次移除这个cURL句柄,因为它已经没有利用价值了,关了它!
- 很好,现在可以另外加一个URL进来了。再一次地,初始化工作又开始进行…
- 嗯,该干的都干了。关闭批处理器,生成报告。
- 回过头来看给批处理器添加新URL的函数。这个函数每调用一次,静态变量 $index 就递增一次,这样我们才能知道还剩多少URL没处理。
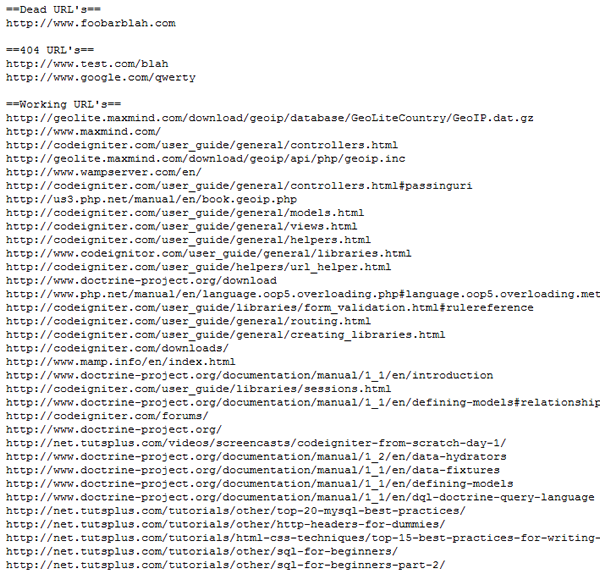
我把这个脚本在我的博客上跑了一遍(测试需要,有一些错误链接是故意加上的),结果如下:
另一些有用的cURL 选项
HTTP 认证
如果某个URL请求需要基于 HTTP 的身份验证,你可以使用下面的代码:
1 2 3 4 5 6 7 8 9 10 11 12 13 14 |
$url = "http://www.somesite.com/members/"; $ch = curl_init(); curl_setopt($ch, CURLOPT_URL, $url); curl_setopt($ch, CURLOPT_RETURNTRANSFER, 1); // 发送用户名和密码 curl_setopt($ch, CURLOPT_USERPWD, "myusername:mypassword"); // 你可以允许其重定向 curl_setopt($ch, CURLOPT_FOLLOWLOCATION, 1); // 下面的选项让 cURL 在重定向后 // 也能发送用户名和密码 curl_setopt($ch, CURLOPT_UNRESTRICTED_AUTH, 1); $output = curl_exec($ch); curl_close($ch); |
FTP 上传
PHP 自带有 FTP 类库, 但你也能用 cURL:
1 2 3 4 5 6 7 8 9 10 11 12 13 14 15 16 17 |
// 开一个文件指针 $file = fopen("/path/to/file", "r"); // url里包含了大部分所需信息 $url = "ftp://username:password@mydomain.com:21/path/to/new/file"; $ch = curl_init(); curl_setopt($ch, CURLOPT_URL, $url); curl_setopt($ch, CURLOPT_RETURNTRANSFER, 1); // 上传相关的选项 curl_setopt($ch, CURLOPT_UPLOAD, 1); curl_setopt($ch, CURLOPT_INFILE, $fp); curl_setopt($ch, CURLOPT_INFILESIZE, filesize("/path/to/file")); // 是否开启ASCII模式 (上传文本文件时有用) curl_setopt($ch, CURLOPT_FTPASCII, 1); $output = curl_exec($ch); curl_close($ch); |
翻墙术
你可以用代理发起 cURL 请求:
1 2 3 4 5 6 7 8 9 10 |
$ch = curl_init(); curl_setopt($ch, CURLOPT_URL,'http://www.example.com'); curl_setopt($ch, CURLOPT_RETURNTRANSFER, 1); // 指定代理地址 curl_setopt($ch, CURLOPT_PROXY, '11.11.11.11:8080'); // 如果需要的话,提供用户名和密码 curl_setopt($ch, CURLOPT_PROXYUSERPWD,'user:pass'); $output = curl_exec($ch); curl_close ($ch); |
回调函数
可以在一个 URL 请求过程中,让 cURL 调用某指定的回调函数。例如,在内容或者响应下载的过程中立刻开始利用数据,而不用等到完全下载完。
1 2 3 4 5 6 7 8 9 10 |
$ch = curl_init(); curl_setopt($ch, CURLOPT_URL,'http://net.tutsplus.com'); curl_setopt($ch, CURLOPT_WRITEFUNCTION,"progress_function"); curl_exec($ch); curl_close ($ch); function progress_function($ch,$str) { echo $str; return strlen($str); } |
这个回调函数必须返回字串的长度,不然此功能将无法正常使用。
在 URL 响应接收的过程中,只要收到一个数据包,这个函数就会被调用。
小结
今天我们一起学习了 cURL 库的强大功能和灵活的扩展性。希望你喜欢。下一次要发起 URL 请求时,考虑下 cURL 吧!
谢谢!
from http://phpe.net/2010/08/techniques-and-resources-for-mastering-curl/


0 条评论。